|
Midget Submarines
(a) Britain
The British Midget Submarines were known as "X-Craft,"
In May of 1943 the Royal Navy started to develop their midgets, they were of 30 tons, and 48 feet long overall. Surfaced they had a speed of 6.5 knots, and submerged 5 knots, they carried a crew of 4. Unlike the later Japanese midgets, they did not carry Torpedoes, but in lieu, had two portable mines that were detachable, to later be set up under their target. A clockwork mechanism was designed to trigger the detonator, allowing the crew to escape.
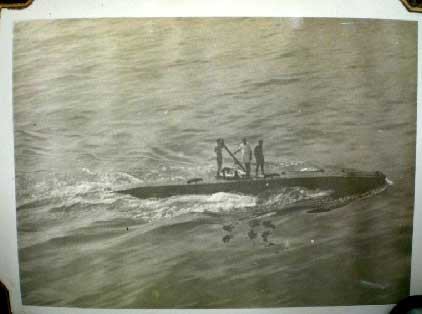
British Midget Submarine XE-5 taken in Subic Bay from the deck of HMAS Shropshire
On the night of the 11th/ 12th of September, 6 X-Craft sailed under tow by 6 conventional submarines. They were named X5, X6, X7, (their target the "Tirpitz") X9, and X1O, (to attack the "Scharnhorst') and the final craft, X8, (it's target, the "Lutzow.")
The first two German ships were believed to be in Altenfjord, and the "Lutzow" in Langefjord, Norway. X9 and crew were lost on tow. It was always a hazardous operation to be under tow and on board an X-Craft. XS was forced to scuttle, having ballast tank failure, but on this occasion her crew were all rescued.
Since the last photographic reconnaissance, "Scharnhorst" had left her anchorage to go to sea to undertake exercises. K.R. Hudspeth, an Australian Reserve Lieutenant, was forced to call off his attack after his compass and periscope were damaged in boom defence equipment. After laying on the bottom during the 22nd. of September, Hudspeth crawled out to sea again, and it was another 6 days before he managed to meet up with a Mother Submarine who took him in tow.
However in a subsequent storm, X1O, sank still 400 miles from the Shetlands and home. Hudspeth however survived this ordeal, and the war. X5, X6, and X7 all navigated the German mine field on the night of the 20th. of September but then, X5 disappeared, never to be heard from again, ( although German sources claimed to have sunk a Submarine on the morning of the 22nd in the vicinity of Kaa Fjord. )
It must be presumed that this action claimed Lieutenant Henty-Creer, and his crew members in X-5.
X6, and X7 reached their target the "Tirpitz", and Lieutenant Cameron, in X6, dropped his charges, scuttled the boat, and he and his crew were taken prisoner. Lieutenant Place in X7, placed their explosives, then became entangled in German Anti-Submarine nets. A huge blast crippled the "Tirpitz", and at the same time freed X7, but she was abandoned. Place and one crew member escaped to the surface, only to be captured. Both Place and Cameron were awarded the Victoria Cross, which after the war had ended, they were able to collect personally.
Although not eliminated, this action for some months eased the worry about the "Tirpitz" being loose on tIre Convoy routes of the Atlantic and to Russia.
British Midgets attack Japanese shipping in Singapore.
On the 31st of July in 1945, two British Midget Submarines which had been towed by Submarine from the Philippines entered Singapore Harbour.
Leading Seaman Mick Magennis from Belfast, spent half an hour under water, to fix six limpet mines to the hull of the Japanese Cruiser "Takao."
A large hole was blown in her hull, but being in shallow water, she only settled on the bottom. Both the Midget's Captain, Lieutenant Ian Fraser, and Leading Seaman Magennis were awarded the Victoria Cross. However to the crew's chagrin, they later discovered that a U.S Submarine, had damaged the 'Takao's" stern whilst she was at sea.

British Midget Submarine XE-5 taken in Subic Bay from the deck of HMAS Shropshire
The two pictures of British Midget Submarine XE-5, in Subic Bay the Philippines, were taken from the deck of HMAS Shropsrire in July 1945.
I was in the ship at that time.
I am beholden to Bob Meade for these photos and the following text.
" XE-5 and crew were assigned Operation Foil - cutting the Japanese telecommunications cable in Hong Kong bay.
XE-5's crew was:
Lt. H.P. Westmacott, RN
1st. Lt. Beadon Dening, RNVR
ERA Clifford Greenwood
Lt. B.G. Clarke, RNVR
Sub-Lt. D.V.M. Jarvis, RNVR
Today I was able to speak to Mr. Max Shean (DSO and Bar, Bronze Star). For a comprehensive summary of his midget submarine actions in WWII go here.
Mr. Shean kindly consented to answer my questions about the photographs. He said that the midget submarine he commanded, XE-4, was never in Subic Bay, and instead was launched from Brunei Bay for its mission off Saigon.
He further stated that XE-5 was launched from Subic Bay, and that one of the crew members visible on deck in the photograph was most likely "Pat" Westmacott , commander of XE-5 for its mission in Hong Kong Bay. A New Zealander who joined the Royal Navy.
So, the midget submarine in the photograph is XE-5, in Subic Bay prior to Operation Foil."
Mac
(b) Japan
Japanese Midget Submarines were designated Types A, B, C, and D. All types were fitted with 2 by 18 inch Torpedoes. Type A, of 46 tons, could not recharge batteries as this boat did not carry a generator. However 42 vessels were built.
5 were launched in the attack on Pearl Harbour, but all were lost. This Type of Midget had an 80 mile range, at only 2 knots on the surface, or a submerged speed of 19 knots, but the batteries lasted for only 55 minutes.
The Pearl Harbour attack pointed up the limitations of this Type; Type B were fitted with a diesel generator which needed 18 hours to recharge batteries and increased the tonnage to 50 tons. This group were numbered HA 43 to HA 61.
The next group, Type C, also of 50 tons, were classified HA 62 to HA 76, and achieved an extra 50 miles radius at 6 knots on the surface.
The final group, Type D, were 4 feet longer, the first, HA77 being completed in January 1945. They weighed 60 tons, could dive to 328 feet, and by September 1945, 115 were completed, and another 496 hulls were in various stages of construction.
Koryu Suicide Craft
The first prototype was built in 1943, followed by the second in 1944.
These craft weighed 19.5 tons, and were designed to carry 2 by 18 inch Torpedoes, but were adapted to enclose a 600 kilogram charge of explosive in their nose, to be set by a firing pin. A complement of 5 manned this formidible weapon which could range over a 1,000 miles, and produced a top under water speed of 16 knots.
At the Japanese Naval Base at Kure, a mass of these Submarines were huddled together, cheek by jowl, in a huge building area, probably as many as a hundred of them, waiting to be used in the final onslought against the Allied invasion of Japan.
Kairyus
A 2 man Submarine, that could dive to 480 feet, but if 2 Torpedoes were slung below the hull, the diving depth was reduced to 330 feet.
Some 215 were completed with the hull built in workshops in 3 separate sections, and then assembled on a dockside, or on slipways in only 30 days. A further 207 were under construction at the end of the War.
Japanese Midget Submarine Attacks
(a) At Madagascar
In May 1942, Madagascar lay in the hands of the French. It was located in a strategic segment of the Indian Ocean, an ideal base for both German and Japanese Naval forces.
Allied lines of communication could be threatened from the excellent harbour provided by Diego Suarez.
Churchill had stated "Too much stress should not be laid on gaining control of the whole island --- all that matters are the two or three principal centres, but above all Diego Suarez."
He was mindful ofthe "Dakar fiasco," in which De Gaulle with his French troops had joined with British forces on the 23rd, 24th, and 25th, of September 1940, this affair proving to be an absolute disaster.
I had been but a small participant on that occasion, serving as a Midshipman in H M A S "Australia." This action was, in fact, my first time under fire. My Midshipman's Journal recorded that "I am appalled that General De Gaulle could just decide not to support us, indicating that he could not shed the blood of Frenchmen for Frenchmen."
Our Walrus Aircraft was shot down by the French with the loss of all it's crew, and the ship was twice hit by French shells. The British Prime Minister decided not to include any Free French Troops in this proposed operation, and did not disclose any plans to De Gaulle.
British Troops were landed in the South West of Madagscar on the 5th, of May 1942. By the middle of that month, it was all over, and the port of Diago Suarez was in British hands.
Meanwhile, Japanese Submarines I16, I18, I20, all carrying a Midget Submarine on deck left Penang for the invasion area, the Squadron leader I10, carried a scouting seaplane. Both I16, and I20 suffered storm damage, and I18 had water enter her Port engine damaging 4 pistons. She reported that repairs would take two months and were beyond the competence of her crew.
'The Aircraft from I10, on the 29th of May, reported a Battleship (the" Ramilles.") anchored in the North West corner of the harbour, plus other war ships, and a Tanker. This was the 10,400 ton "British Loyalty." A decision to attack these ships was then made by the Japanese Submarine conrrnander. Both I16, and I20 launched their Midget Subs on the 30th. of May. Lieutenant Akieda, and Petty Officer Takemoto in the Midget from I20, and Ensign. Katsusuki. Iwase, and Petty Officer Takazo Taketa in I16's Midget.
The moon was fulI, providing a clear bright night. "Ramilles" was anchored, as was the "British Loyalty," close to Antsirane Light house. At about 2015 (8.15 PM.) "Ramilles" was struck by a Torpedo on her Port side, in the middle of a 4 inch gun magazine. A 30 by 30 feet hole was made, and the ship began to list. In the "British Loyalty," her crew were desperately weighing anchor, just as the anchor broke away from the bottom, and the ship started to go astern. She ran into a second Torpedo aimed at the "Ramilles."
This Torpedo hit the Tanker in the engine room (no one managed to escape from here) and she quickly sank in 67 feet of water.
The Midget crew from I20 managed to get ashore, and were picked up by British troops. The two Japanese sailors refused to surrender, and were then shot.
A third Japanese body, which had to come from I16's Midget, was washed up on the beach. The final member from the Midget crews was never recovered. "Ramilles" limped off to Durban escorted by a Cruiser, 3 Destroyers and a Tug, and then she madean uneventful voyage back to Plymouth where she arrived on the 8 th of September, and was in all, a year out of action. The "British Loyalty" was raised in December 1942 and was moved to the Maldives in October 1943, where she was used to store oil.
(b) At Sydney
Japanese Midget Submarine attack on Sydney Harbour on the 30th. May, 1942
On the 11th of May, 1942, the Japanese 8th Squadron boats, I22, I24, I28, and I29 having been involved in the Coral Sea operation were ordered to Truk to embark Midget Submarines to attack Naval targets at either Suva or Sydney. Two seaplane carrying boats, I21, and I29, were proceeding to reconnoitre both Suva and Sydney.
I28, did not reach Truk. She was sighted on the surface by the U.S. Submarine "Tautog" which was enroute from Pearl Harbour to Fremantle, Australia. I29 was sunk by two Torpedoes from the U.S. Submarine. The other 3 I class with Midgets clamped to their decks sailed from Truk for Sydney about the 20th. of May, whilst the seaplane from I29, carried out a reconnaissance flight over Sydney on the same date, confirming "both Cruisers and a Battleship anchored there."
It would seem likely that the U.S. heavy Cruiser, "Chicago" with her heavy type of upper works was mistaken for a Battleship. By the night of the 29th. of May, 5 I boats were stationed close to 35 miles North East of Australia's largest city, and it's major Naval Base, Sydney.
These Japanese Submarines were:- I 21, (with an aircraft) I 22 (carrying Midget No.21) I 24 (carrying Midget A. It was given this designation, as this craft was not recovered, and her number is thus not known) I 27 ( carrying Midget No.14 ) and finally, I 29 ( probably with a damaged aircraft on board.)
On the next day, about 0420 ( 4.20 A.M.) a single float plane burning navigation lights flew over Man of War anchorage in Sydney, and then circled "Chicago" at No 2 buoy. At this time I was serving as a Watch Keeping Sub Lieutenant in H.M A.S. "Canberra," having only recently been awarded my Watch Keeping Ticket. We were secured at No 1 buoy.
An air raid warning was issued in due course, but searches by Fighter Aircraft found nothing, and this incident did not trigger any special defence measures. Post war, it was learned that this Aircraft came from I 21, and the pilot, Lieutenant. Ito flew up the harbour at 600 feet, sighted "Chicago" and 4 Destroyers in Man of War anchorage, and "Canberra" in Farm Cove. He flew back to his Submarine, but on landing close by in rough water, his Aircraft crashed and sank.
lto and his Observer reported "Battleships and Cruisers in Harbour," it was decided to attack the following night, the 31st. of May.
Boom ProtectIon
The boom at Sydney was designed in January 1942, and construction commenced that month. It was located at the narrowest point of the inner harbour entrance, between George's Head, on Middle Head, and Green Point on Inner South Head. This protective net was not actually completed until July.
The single Iine steel Anti-Torpedo net was supported between piles, the centre portion was complete, but there were large gaps at both East and West ends. At the West end, unnetted piles were in position. 8 Magnetic Indicator Loops were in place across the sea floor of the Inner and Outer harbour entrances. The Loop produced a "Signature" when a vessel crossed over it.
Midget I 4, commanded by Lieutenant. Kenshi Chuman with Petty Officer Takeschi Ohmori, was the first inward crossing recorded by the Indicator Loop at 2000 ( 8 P M. ) With ferry and other traffic passing over the Loops, it's significance was not recognised.
About 15 minutes later, Mr J Cargill, a Maritime Services Board watchman, reported a suspicious object trapped in the net. With his assistant, he investigated this object from a skiff which they had towed over to the scene, and he reported it to Lieutenant Eyers, an R A N V R officer in charge of H M A S "Yarroma," a Patrol boat.
Eyers did not close the mysterious object fearing that it may be a Magnetic Mine, so he sent a Stoker in a skiff to investigate, and it was 2230 (10.30 P.M., ) an hour and a half after Cargill first reported his discovery, that Eyers reported the object trapped in the Boom net was, in fact, a Submarine, and he asked permission to open fire. But Lieutenant Chuman, hopelessly entangled in the net, solved this dilemna, by firing demolition charges which destroyed both the Submarine and it's crew of two.
Midget A, with Sub Lieutenant Katsushisa Ban, and Petty Officer Marmoru Ashibe, and Midget 21, with Lieutenant Keiu Matsuo, and Petty. Officer Masao Tsuzuku on board, had been ordered to follow Midget I4 at 20 minute intervals. Ban had registered a Loop crossing at 2145 (9.45 P.M. ) and proceeded up the harbour with the "Chicago," as his target.
At long last some action was forthcoming. The "General Alarm" was ordered at 2227, ( 10 27 PM) by Rear Admiral Muirhead-Gould, the Naval Officer in charge at Sydney.
Meanwhile, Ban was having problems with the depth keeping behaviour of his Midget; it kept coming to the surface, and lookouts in "Chicago" sighted him, but Ban managed to submerge. "Chicago" opened fire with a 5 inch gun, but the Midget was too close to hit. The Corvettes "Geelong," and "Whyalla" alongside the Oil Wharf at Garden Island sighted Ban's conning tower. 20 mm fire from "Geelong" and searchlight searches by both ships proved abortive.
At this time the third Midget was approaching the Anti-Torpedo net area, but Lieutenant Matsuo was having his problems with the trim of his Boat, and he was sighted by the unarmed Patrol vessel "Lauriana", then "Yandra" attacked with a pattern of 6 Depth Charges, after a series of explosions, Midget 21 was not seen again.
Flood lights at the Graving Dock illuminated the scene very well, no one had thought to order them to be extinguished up to now, and they silhouetted the "Chicago." Finally, the lights were extinguished at 0025, (12 25. A M. ) It was now the 1st. of June.
Ban was now ready to sink the "Chicago. He was in position 800 meters from his target, and should not miss. He set his Torpedo to run at a depth of 2.4 meters- ("Chicago" was 170 meters long, with a draught of 7.6 meters ) He fired. Once the Torpedo lelt it's tube, the Midget lost stability, it's bow breaking the surface. It was a further 2/3 minutes before Ban could regain trim.
The Torpedo veered off course, passing well ahead of "Chicago", and under tIre Dutch Submarine K9, then under H M A S "Kuttabul" an old Sydney ferry, used as a Naval accommodation vessel, berthed alongside Garden Island.
The Torpedo struck the retaining wall, and exploded, lifting "KuttabuI" high out of the water, before coming to rest on the bottom. 21 Naval Ratings died. Ban fired his second Torpedo at "Chicago", but it missed by some 4 meters. It ran aground on the east side of Garden Island without exploding.
By now the harbour was in absolute turmoil. I can recall ships and small boats rushing all about, search lights playing around, guns being fired, and nobody really knowing what was going on.
Captain Bode in "Chicago" decided he had had enough of this chaos within the harbour and took his Cruiser to sea, not knowing that there were 5 I class Japanese Submarines in fact lurking off the Heads of Sydney Harbour, hopefully awaiting the return of their Midgets.
Midget 21, had not been sunk by "Yandra", and was discovered inTaylor Bay. She was then battered by attacks from "Steady Hour", "Sea Mist", and "Yarroma". Later, on the 1st. of June, Naval Divers found the Midget on the Harbour floor, both Torpedoes jammed in their tubes, her crew dead, and the propellors still turning. One of the Divers used was Able Seaman Jack Greening, a cousin of mine.
A registered Loop crossing was recorded at 0158, (1.58 AM. ) and in the subsequent analysis it was determined this was an outwards crossing, which could well have been made by Midget A, with Ban making his escape after his abortive attempts to sink the "Chicago". However Ban and his crew member were never found. He did not make the rendevous with his Mother Submarine, and his actual fate is not known.
Earlier this year, in March 1997 there was a report that a metallic object had been located in the sea off Cronulla. There was speculation that it may be the remains of Ban's Midget Submarine. Who knows? We may still find that the final resting place of Midget A is discovered.
The Royal Australian Navy history notes;- "Luck was certaInly on the side of the Defenders, and was undeserved in the early stages when inactivity and indecision were manifested."
On the 9th. of June 1942 at 1130 (11.30 A.M. ) the 4 bodies of crewmen from the two sunken Midget Submarines were cremated with full Naval Honours at Sydney's Fastern Suburbs Crematorium, their ashes were returned to Japan.
A memorial plaque for those who took part in this daring but unsuccesslul raid on our shipping on the 31st. of May and the 1st. of June in 1942 was erected and unveiled at Garden Island, Sub Lieutenant Ban's Mother made the journey from Japan to be present at this ceremony.
next chapter
back to Under Water index
|